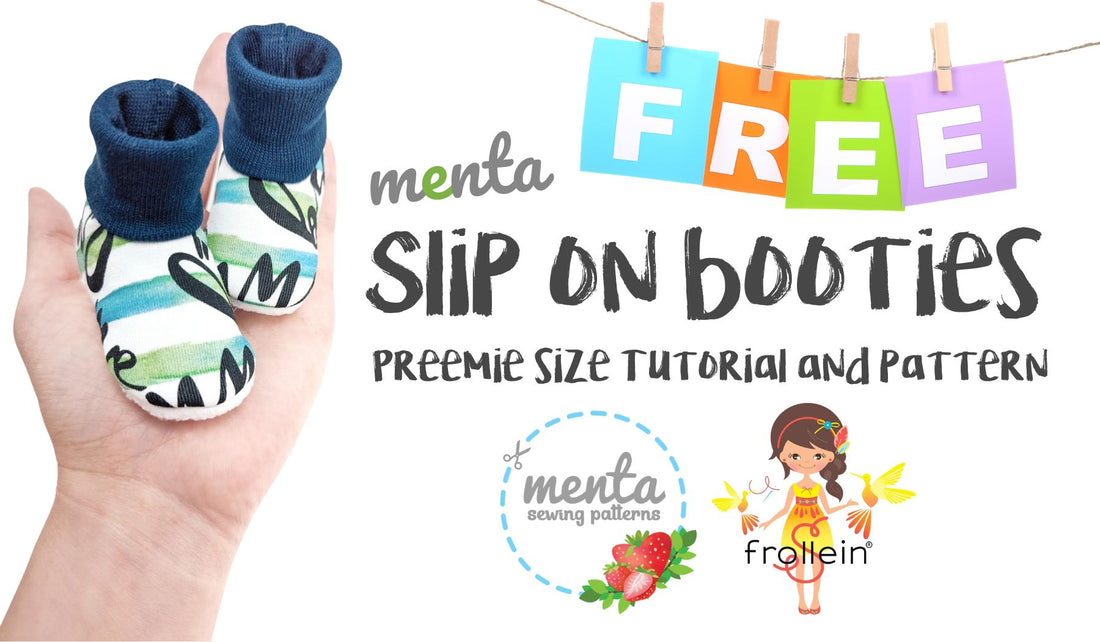
FREE Preemie Slip-on Menta Booties Sewing Pattern
Finding preemie clothing can be challenging. And more when as moms, the arrival of our babies happens unexpectedly a few weeks before our original due date. Finding the time to browse, or even time for sewing can a difficult task to achieve.
While the Slip-on Menta Booties are available in all sizes to purchase here, with the help of Frollein S Fabrics, I have decided to offer to the sewing community the smaller size of them for free, hoping that you can donate or provide NICU moms some help.
These booties have no left or right side, both booties are shaped the same. Pattern pieces include the option of cutting them with 1/4" seam allowance as well with no seam allowance in case you like to use your own. For this tutorial, all the instructions are based on 1/4" allowance unless stated differently.
You can download the printable pattern here (for download the projector file you can click here), and follow these instructions to put these cute little booties together, the instructions include the hidden seams version only. Original tutorial includes:
- 3 size ranges, baby, young child and adult, offered in 3 separate listings.
- Each size include a wide and a narrow fit
- Toe reinforcements and cute applique templates included
- Can be made with 100% hidden or exposed seams
- Light/medium to heavy weight knits
- Cute animal toes add-on
- Step-by-step tutorial
- Projector file included
- Pattern layered, requires Adobe Acrobat Reader, and it can be printed on Letter or A4 paper.
All the sizes from new born to adults plus the full tutorial (with multiple options) you can purchase here. Use the code SLIP15 to get 15% off any of the 3 range of sizes!

* In the picture above you can see the gorgeous fabrics that Frollein S provided me to make this post possible. Their organic custom printed cotton Lycra jersey is perfect for little footwear and the ribbing is amazing: so stretchy, vibrant colour and the wrong side is brushed for extra warm cuffs!
Materials you need:
- 10" by 6" (25.4 cm by 15.2cm) Main stretchy fabric. For tiny baby clothing I always recommend to use soft stretchy materials. My favorites are cotton Lycra or bamboo cotton jersey.
- 10" by 6" (25.4 cm by 15.2cm) Lining stretchy fabric. You can use a piece of the same fabric you are using for the main, be sure fabrics are breathable. Microfleece or bamboo terry are my first 2 options for baby footwear lining.
- 12" (30.4cm) width (stretch direction) by 6" (15.2cm) 1x1 or 2x2 ribbing. Ribbing is a stretchy fabric with great recovery, used for sweater or pants cuffs.
- 2 pieces of 4" by 4" (10cm by 10cm) of fabric to construct the main and lining soles. For these specific size of slippers I always use any very soft fabric. I will be using microfleece because I like the texture and structure of it, as well because it is breathable.
- A sewing machine setting for stretch stitch (All home sewing machines include this feature, you can use the zig-zag stitch or a stitch that looks like a lightning bolt, a regular stitch will work amazing too)
- 14/90 stretch or ball point needle.
- Laptop, paper and printer to retrieve the sewing pattern.
Instructions:
1. Print the page on "actual size" or 100% scale (This is very important) and "auto orientation". Check the 1" square measures exactly 1" (There is a 3cm square as well for metric measure).

2. Cut out off the paper pattern pieces and use them to cut the fabric as instructed on each pattern piece.

3. You might have: 2 main pieces, 2 lining pieces, 2 ribbing cuffs, 2 main soles and 2 lining soles.

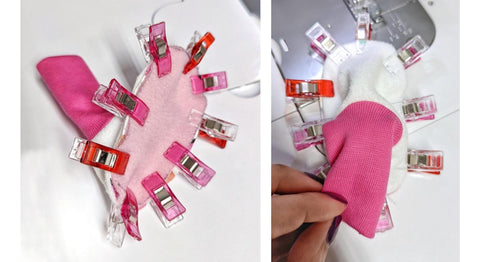
4. Now let's sew! Take one toe lining, one toe main and one ribbing piece. With the right sides together, pin or clip the "centre cuff" of the toe main on the centre of the cuff piece. Then pin or clip the "centre cuff" toe lining on the other cuff centre. Notice all the pattern pieces have a centre mark on them.

5. Now pin or clip each of the inner corners of the toe pieces to each of the corners of the cuff piece, like this:

6. Because the cuff is narrower than the bootie toe piece, you will need to stretch it slightly to fit. It is important to only stretch the cuff and not the main or lining to avoid wavy seams, you can add more clips or pins to accommodate all the bootie fabric to the ribbing.
![]()
7. Now we need our sewing machine to sew these pieces together at the orange dashed line. Either a regular or a stretch stitch works great. You will sew along the edges leaving a 1/4”(6mm) seam allowance, first with the lining and then with the main piece. Stretch the cuff as you go.

8. Flip your bootie right side up and then fold it vertically to match the long edge as shown here. Pin the cuff/toe seams open to avoid extra bulk at the heel of the
booties. Now you will sew all along the back of the bootie, I have drawn an orange dashed arrow to show you where to sew.

9. Flip the right side of the booties out until the sole edges match. With the heel seams open, pin and clip the toe and heel centre points, wrong sides together.

10. Now you are ready to attach the soles, in this tutorial I am sharing with you how to attach the soles with hidden seams. I suggest starting with the sole main first so you have the hand stitching on the inside, especially for thicker sole fabrics. So to start, your bootie must be with the lining side out.

11. Place the lining side of the bootie right sides together with the sole lining, matching the front and heel centre points. Place a pin or clip to keep them together.

12. Once toe and heel centres have been matched, keep pinning or clipping around the entire sole, and sew all around the sole edge leaving 1/8" (3mm) seam allowance. (I always recommend 1/4" seam allowance but for sewing this piece only you will use 1/8")
TIP: for the very small sizes, you may need to switch your machine foot to a narrower one, like a zipper foot, if you have trouble sewing around the sole.

This is how it looks after sewing the first sole.
13. Now we will attach the outer sole main by making a sandwich. Lay the bootie with the right side and cuff up. Fold the cuff so that it fits within the edges of the bootie as shown here. We want to avoid sewing over the cuff, so it needs to fit inside the 1/4” (6mm) seam allowance line.

14.Place the right side of the sole main on top of the bootie, matching the toe and heel centres. Start by pinning or clipping at these points and then make your way around the rest of the bootie, being careful not to catch the cuff. Because the size of these booties is so small, I place the cuff outside the sandwich and sew around the entire sole except at the opening where the cuff is, leaving this time a 1/4" (6mm) seam allowance. I highly recommend to sew around the sole at the sole side you previously sewed with the 1/8" seam allowance, this way you can make sure you are sewing inside the 1/8" seam.
We will use this opening to turn our shoe right side out.


Once the bootie is completely turned out, use your finger to push all the seams out to give the sole a nice, curved shape. (The picture below belongs to the original sewing pattern)
Repeat with the other bootie.

15. You are almost ready, now you need to close that opening with an invisible hand stitch, some makers call "ladder stitch" or "mattress stitch". Get a long thin needle ready with a 12”(30.4cm) double thread with a knot at the end.
Follow the next set of steps to close your bootie opening.
- Slip your threaded needle inside the fold, to hide its knot.
- Bring the needle out, through the folded edge.
- Push the needle into the opposite fold directly across from the fold, where it came out.
- Slide along this opposite fold, about 1/4” (6mm), staying inside the fold, then push the needle out again.
- Bring the needle straight up from where it came out, and insert into the opposite fold.
- Continue this back-and-forth-and-slide pattern until you reach the end of your opening.
- Pull the thread tight to close the gaps between the stitches and tie off the end. Use the needle to bring the tail between the fabric layers to hide it.


* The picture above belongs to the original tutorial, I found the sewing diagram is pretty clear!

Now you can turn your bootie right side out.
Congratulations!! You have finished your first bootie!!


I would like to extend my gratitude to Caro, she admins the Frollein S facebook group, for showing interest on my artwork, her sewing skills are amazing and I enjoy every chat with her not only regarding sewing!! Thank you so much <3 Thanks to our sewing community I have been able to meet beautiful and talented humans!
Want to know about more Frollein S Fabrics?
Facebook Group: https://www.facebook.com/groups/1415631448751459
Facebook Page: https://www.facebook.com/FrolleinS
Instagram: https://www.instagram.com/frollein.s.usa
Website: https://frollein-s.com/